
Mastering Bass Plucking: How to Play Bass With Your Fingers
Have you ever looked at your bass strings and felt like you were trying to decode Morse code with your fingertips?
We’ve all been there!
That mix of pumped-up enthusiasm and "What on earth am I doing?"—is practically a rite of passage for every beginner bass player.
What if you could cut through the confusion with just a few helpful tips?
Well, you’re in luck. Today I'm sharing two plucking techniques that'll turn your fingers into groove machines. No fluff, no filler—just the real deal techniques that are absolute game-changers!
Originally published on November 23rd, 2023, this article was updated and republished on May 23rd, 2024.
Plucking Basics
Before you can run, you’ve got to learn how to walk. So before I break down the two techniques, let’s cover some fundamentals of plucking.
Finger Numbering
Each of your fingers is assigned a number. This gives bassists a way to communicate with each other without confusion and makes learning much simpler.
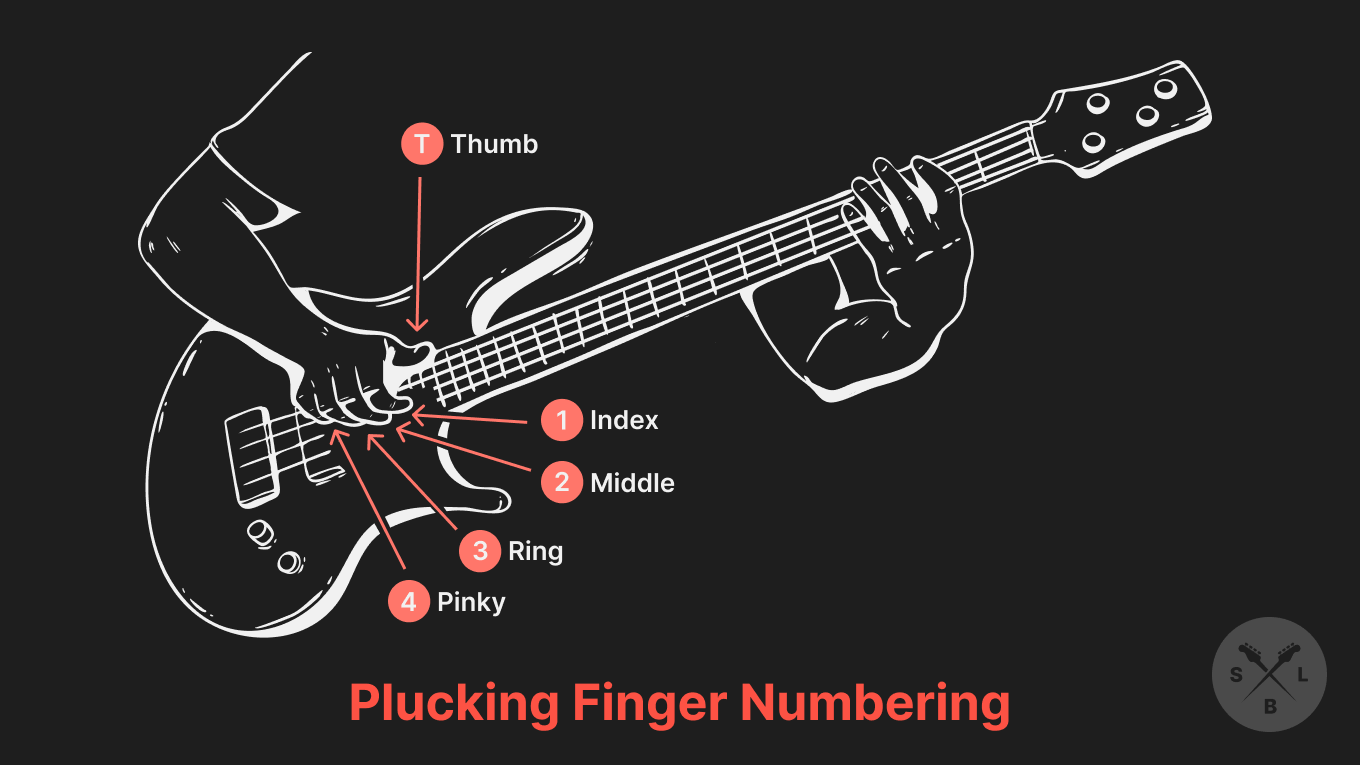
T = Thumb
1 = Index finger
2 = Middle finger
3 = Ring finger
4 = Pinky finger
Alternating Fingers
Unless you’re playing slap style, it’s most common to play with two fingers. Most bassists use their index(1) and their middle finger(2) to pluck.
The key to playing fluid and smooth grooves is to keep a steady rhythm. To do that, practice alternating between your first two fingers.
Either 1,2,1,2…
Or 2,1,2,1…
It doesn’t matter which finger you start with. Your goal is to develop plucking speed and efficiency.
Where to Pluck
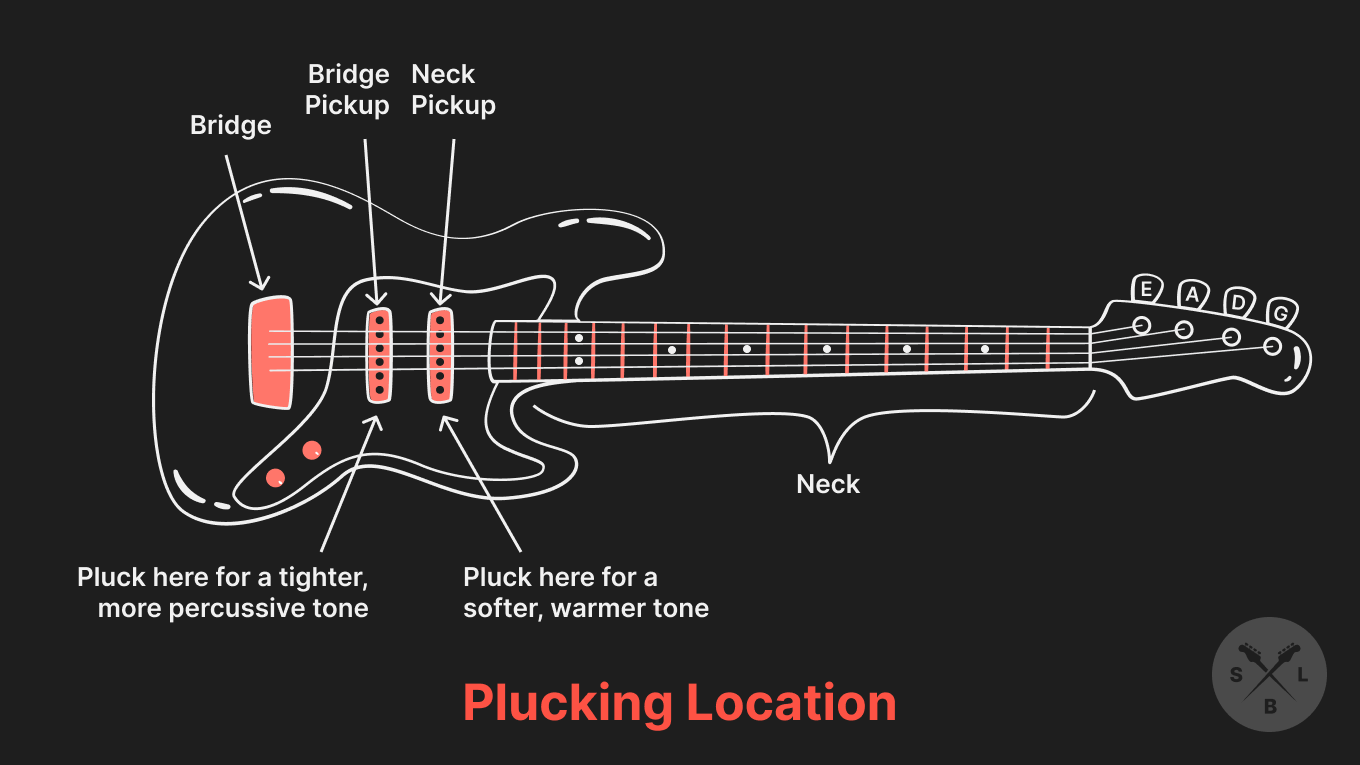
Where you pluck the strings depends on where the pickups on your bass are.
To start, you want to anchor your thumb on your pickup.
Then, as you start to play the thinner strings (D and G), shift your thumb to rest on the thickest string (E).
It’s good to know how the sound changes depending on which pickup you use:
Plucking closer to the neck makes the tone sound softer and warmer.
Plucking closer to the bridge gives you a tighter and more percussive sound.
If you’re not sure what the neck or bridge is, you can learn about the anatomy of a bass guitar here.
Bass Plucking Guide
Now that I’ve covered the basics, let’s talk about the simple steps to start playing:
- Anchor your thumb. Rest your thumb on the pickup and start to pluck the E string with your index and middle fingers, slowly alternating them in this pattern: 1 2 1 2.
- Aim for consistency. Start slow, keep your plucking hand relaxed, and practice until you can pluck the string smoothly.
- Slowly ramp up your speed. Once you’re comfortable alternating your fingers, begin to speed up, making sure to maintain a speed where you can still pluck smoothly.
- Move on to the next string. Once you nail down plucking the E string, move to the A string, repeating the process, then the D string, then the G string.
For some visual help, check out the video below where I guide you through two essential bass-plucking techniques.
Muting
The goal when plucking is to have one string ringing at a time.
Otherwise, you’ll get a sound that’s muddy and all jumbled up—which your bandmates won’t appreciate!
To get an idea of what that sounds like, go ahead and pluck all four strings at the same time.
See what I mean?
The solution to that chaos is muting.
To get a string to stop ringing, you need to touch it with a finger. There are two ways of doing this:
1. The Rest Stroke
This plucking technique is 90% of bass playing, so listen up.
First, keep your wrist relaxed.
Then using your fingertips, roll across the top of the string.
The movement comes from your knuckles. Imagine your index and middle fingers “walking” over the top of the strings.
After you pluck the top of the string, REST your finger on the thicker string below it. This mutes the lower string so only one string rings out at a time.
It gives you a deep and resonant sound.
This might seem obvious, but when you pluck the E string (the thickest string), your finger won’t rest on anything.
Note: Most beginners want to go under the string and pluck upwards. This leads to a weaker sound and makes it harder to play faster tempos with this form.
How to Get Good
Practice alternate plucking (2,1,2,1…) on each string.
Make sure your finger rests on the string below it after plucking—this gets you practicing good habits from the start.
If you want to improve your rhythm, try practicing with a metronome.
2. The Free Stroke
This is a slightly less-known technique, but that doesn’t mean you can’t take advantage of it!
Jazz bassists like Matt Garrison and Gary Willis both made a name for themselves by mastering this plucking style.
So, consider making it part of your bass-playing arsenal.
Here’s how to use it:
With the free stroke, you’re still gliding over the top of the string like you did with the rest stroke. (And not plucking from underneath!)
However, the plucking finger doesn't rest on the string below.
Instead, it moves into mid-air and stops by making contact with your thumb.
Your thumb (not the lower string), acts as the stopping point.
Your fingers will be slightly more “bent” than they are with the rest stroke.
This technique gives you a quicker, tighter, and less bassy sound. Making it ideal for playing faster riffs and solos.
How to Get Good
Just like with the rest stroke, practice alternate plucking on each string. Once you get the hang of it, try switching between both techniques.
The goal is to help you become a more versatile player so you can seamlessly switch between the two techniques depending on what works best for the groove.
Reach Your Bass Playing Goals, Faster
If you're sitting there, bass in hand, feeling a mix of excitement and wondering “Can I really do this?”
Then let me cheer you on, and remind you that you absolutely can!
Every pro bassist started as a beginner. Fingers fumbling, and mind racing with self-doubt.
These techniques are the tools that will help you carve out your unique sound. So, practice them, own them, and then keep learning new techniques.
If you’d like access to courses that focus on these techniques taught by some of the best bass players in the world, then I highly recommend the SBL Academy.
It has hundreds of hours of lessons from some of the world's most talented bass players.
When you sign up you’ll also get a personalized roadmap based on your playing level.
If you’re interested, check out the SBL Academy, free for 14 days!