
NEW Program Alert: The Groove Accelerator is OPEN for enrollment! Limited Time Only —Join Now
3 Beginner Bass Guitar Finger Exercises to Practice Every Day
Does this sound familiar?
If you feel like your fingers are clumsy and uncooperative when you're trying to nail your favorite bass lines, you're not alone. Trust me, every new bassist feels this way at some point!
When your technique isn’t yet hardwired into you, you have to focus on playing the right notes, getting the rhythm down, AND learning finger mechanics – all at the same time!
I’d call that a recipe for frustration! It can prevent you from picking up the bass and jamming.
So today I've got three killer finger exercises lined up for you.
They're like the secret sauce to building finger strength, mastering the fretboard, and gaining that finger independence you need.
And the best part?
They're simple enough to practice every day, even if you've just picked up the bass for the first time!
Bass-Playing Basics
1. Thumb Placement
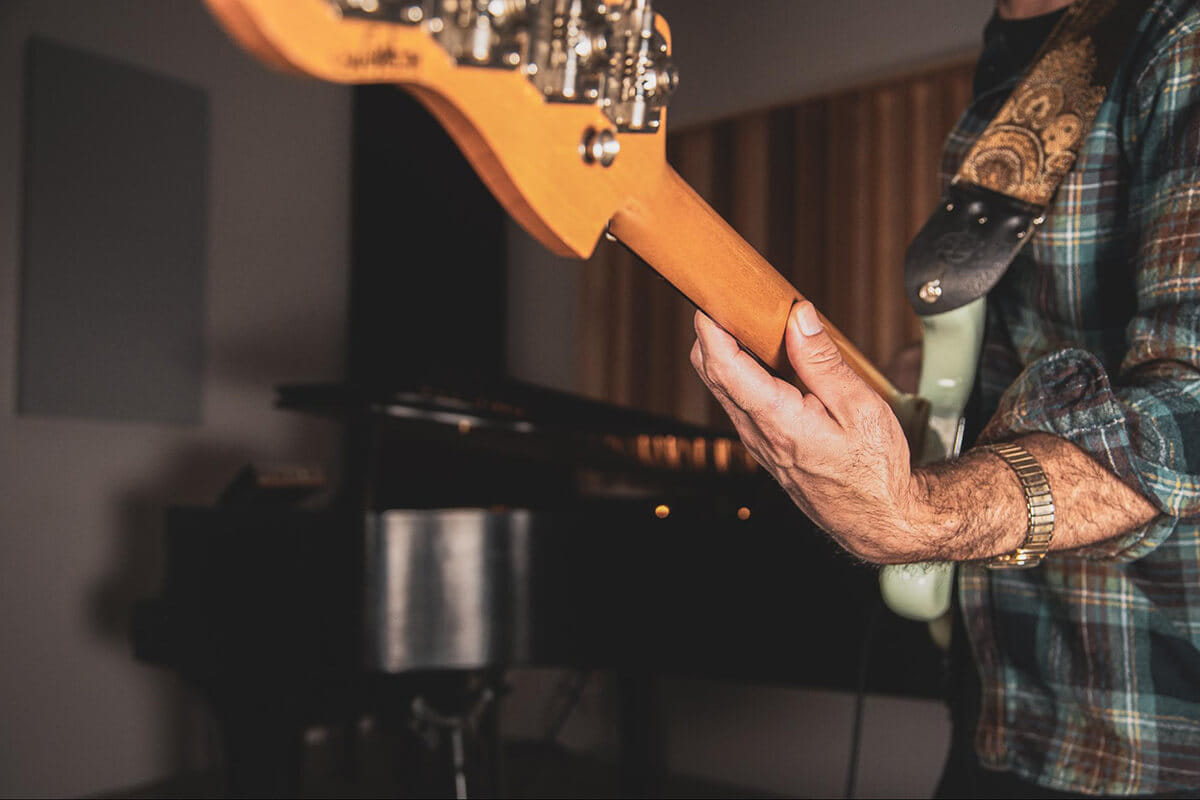
The “go-to” position for your thumb is directly behind the neck.
All of the exercises I’ll show you will only be effective if your thumb is anchored here, so make this the starting point for your thumb.
As you get more advanced, you can experiment with different positions. But for now, just start here.
2. Getting Your Fingers In Position
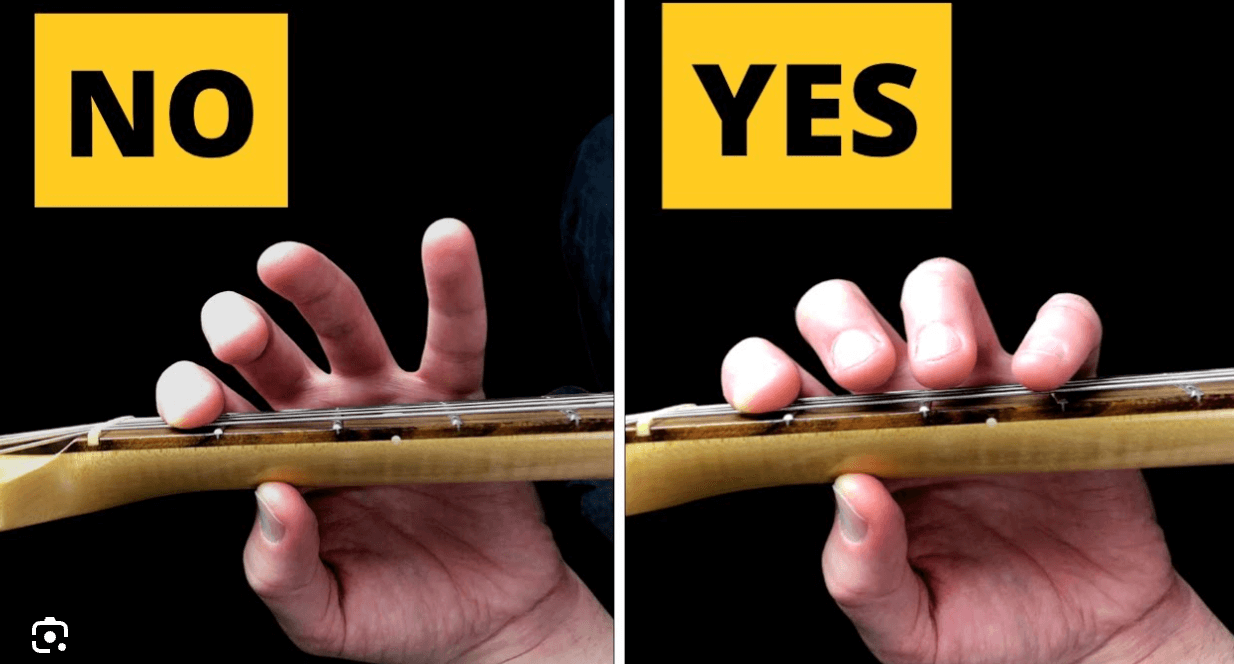
Picture a tennis player in their ‘ready’ stance.
They’re relaxed but in an athletic position and able to move where they need to strike the ball.
I want you to think of your fingers as having an athletic stance.
So what would be the ‘ready’ position of your fingers?
It means you assign one finger per fret. And you keep your fingers close to the fretboard even after you play a note.
This way your fingers have to travel less distance to play notes, and you can play faster bass lines.
3. Getting Into the Right Mindset
When you first start learning bass guitar, stretching your fingers to each fret, and developing finger dexterity are serious challenges!
That’s 100% normal.
You’re actually rewiring your neural pathways, so don’t get mad at your fingers (or yourself for that matter) – they’re doing their best!
Your emphasis should be on consistency, not speed.
Showing up every day, and trying to get 1% better is what will take you to the next level in your bass playing. Think about it, if you got 1% better every day, imagine where you’d be in 100 days. Those are some serious gains!
With that said, here’s a framework for practicing the following exercises:
- Start slow. Learn how to play the exercise without putting any pressure on yourself.
- Use a metronome. Once you understand how to play it, start practicing with a metronome. Use a tempo that keeps you engaged, but isn’t too hard. Keep a steady rhythm as you do this.
- Speed it up. When you can play at a certain bpm consistently, it means you’re ready for a faster tempo. If you keep track of your progress, you’ll start to feel a sense of progress.
At this point, you should be in the right frame of mind to play some bass, so let’s take a look at some useful exercises to help you improve:
1. The Finger-Strength Accelerator
Imagine a baseball player warming up, and swinging a bat with a weighted donut on it. Each swing feels heavy and challenging, but it's all for that moment when he steps up to the plate, removes the weight, and suddenly, the bat feels as light as a feather.
That's the essence of the Finger-Strength Accelerator. Just like the weighted swings, this exercise initially makes your fingers feel like they're pushing through molasses.
But stick with it, and when you finally play without this added 'weight', you'll be amazed at how light and agile your fingers have become on those bass strings.
How to Do It
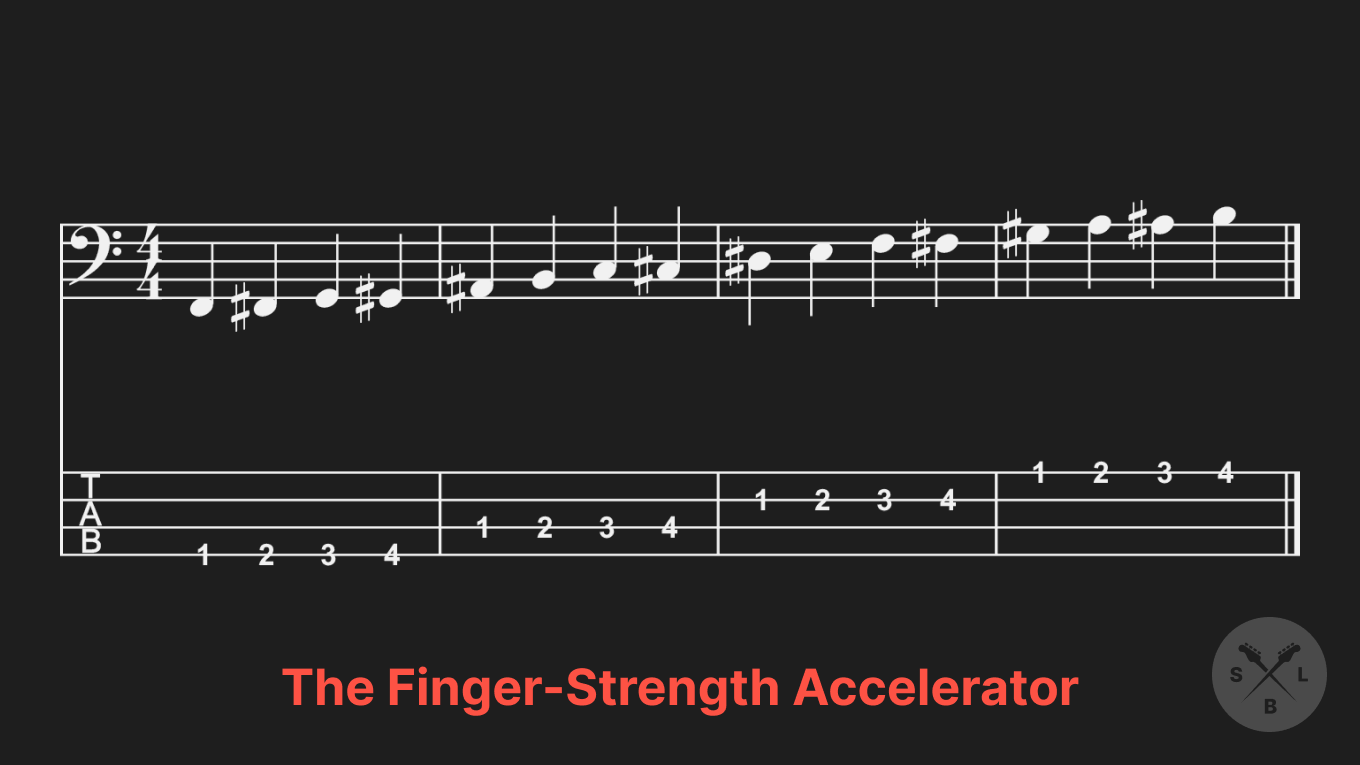
Start on the E string (the thickest one) and place your index finger on the first fret.
Pluck the string. Then, move to the second fret with your middle finger. Repeat with your ring finger on the third fret, and pinky on the fourth.
Easy, right? But here's the kicker: keep your previous fingers pressed down as you move up.
Once you've played the E string, shift to the A, D, and G strings. Same drill.
After you’ve gone from the E to the G string, go back down and do it in reverse.
This might feel like trying to pat your head and rub your stomach at the same time. But stick with it, and you'll feel your fingers getting stronger.
Here’s the tab if you want to follow along. (Check out our article on how to read bass tablature if you’re not sure how to do it)
If It's Too Hard
To make things easier, shift the exercise up the neck (closer to you). The frets are closer together so it’s less of a stretch for your fingers.
2. The Fretboard Enhancer
Learning scales might sound intimidating, but hear me out.
It’s like receiving a map of the fretboard. This exercise will unlock the entire neck for you and not just the first five frets—something most beginners shy away from.
How to Do It
Start by picking any major scale. Let’s use F Major as an example.
The emphasis here is to play three notes of the scale on each string.
So for F Major, you would play:
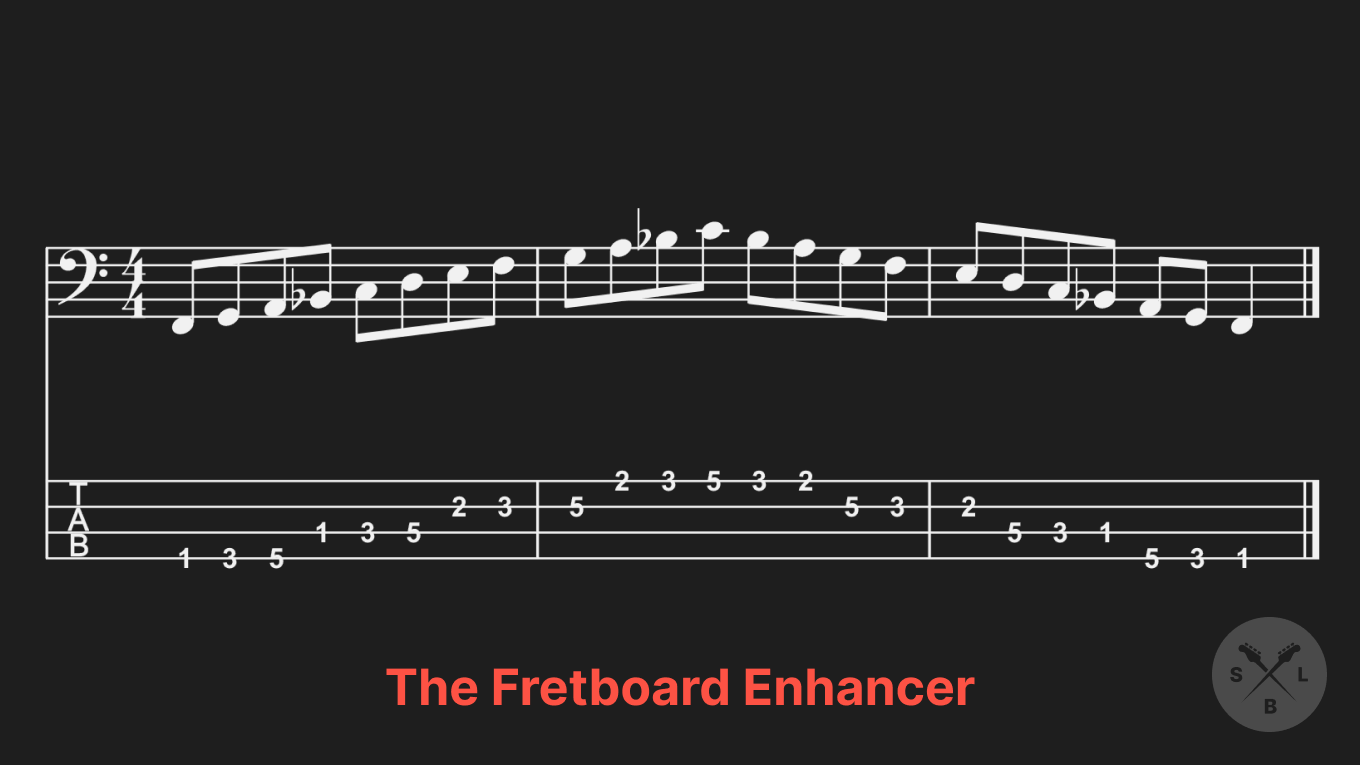
Once you play the scale up and down your strings, you’re going to move up to the next note of the scale.
That note is your new starting point. Play the scale as you did before.
In our example, you would now be starting with G instead of F.
Like this:
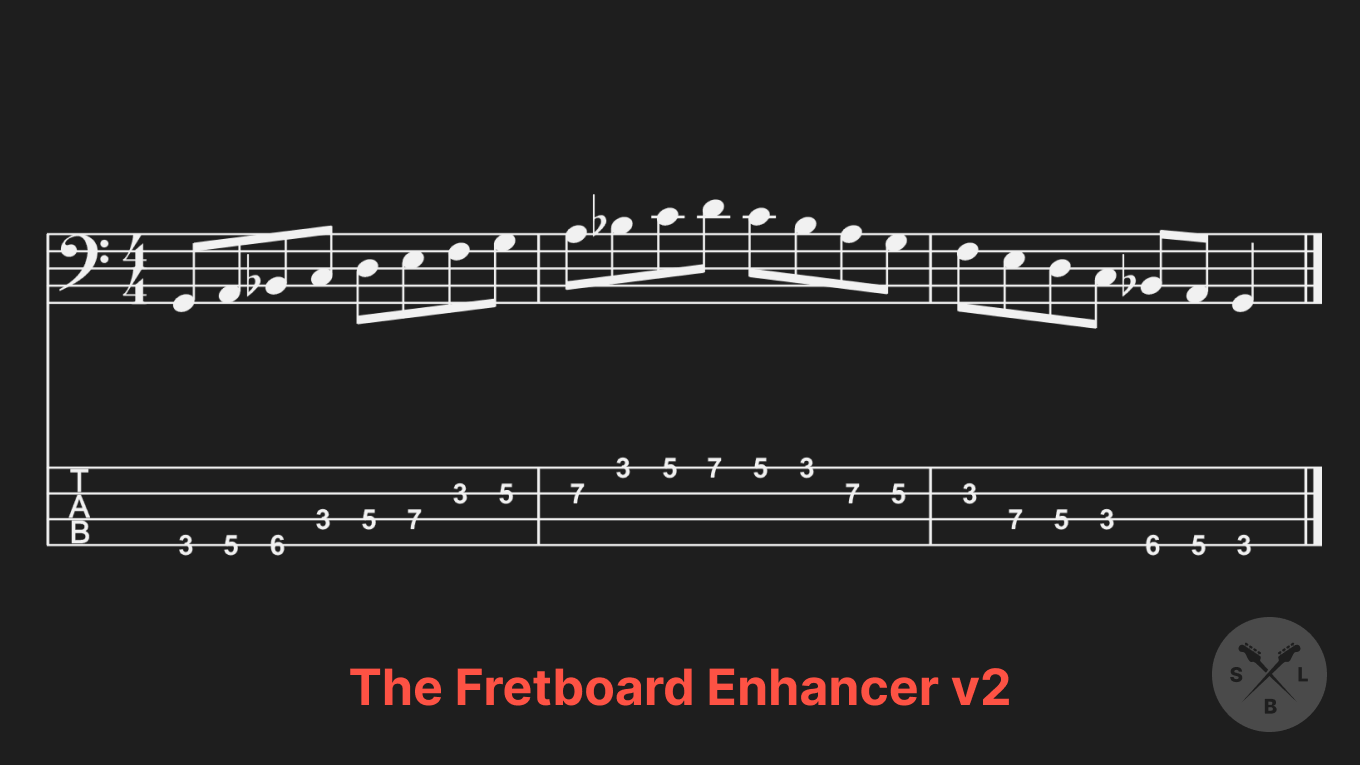
Keep moving the starting note up the neck until you get the original note you started with (F). Then come back down.
3. The Finger-Dexterity Accelerator
A lot of my students have trouble using their ring and pinky (3rd and 4th) fingers when they start on the bass.
This exercise will help you gain control over each of your fingers so that they go where you want them.
How to Do It
There are eight notes in total so I’ll break it into two parts to make it simpler and I’ll give you a tab to tie it all together.
Part I
- Play the 5th fret of the G string with your index finger
- Next, play the 7th fret of the D string with your ring finger
- Play the 6th fret of the G string with your middle finger
- Lastly, play the 8th fret of the D string with your pinky
Get used to that movement.
Don’t worry about which note you’re playing—just remember the pattern. Start slowly and make it fluid. Once you’re comfortable with that, move on to the next part.
Part II
- Play the 7th fret on the G string with your ring finger
- Then play the 5th fret on the D string with your index
- Play the 8th fret on the G string with your pinky
- Finally, play the 6th fret on the D string with your middle finger
Here’s the tab of the whole thing put together:
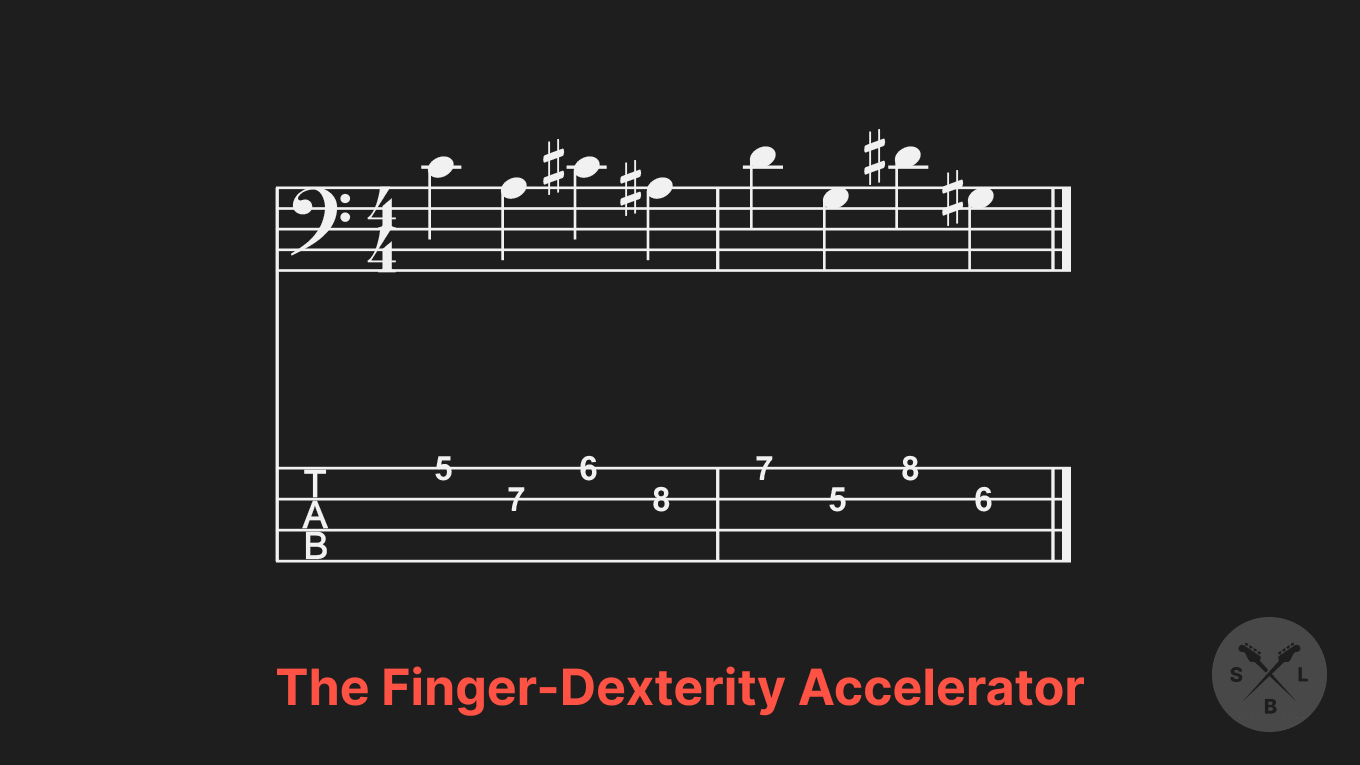
Practice playing it until it’s smooth. Once you’ve nailed it, move down a string and start the pattern on the D string.
Keep playing the pattern across your strings.
Go Beyond Finger Exercises
You're probably thinking, "This is tougher than I expected."
And you're right!
You see, learning bass is like climbing a mountain.
At the bottom, it looks daunting. Halfway up, you wonder if you'll ever make it.
Just remember, every rockstar started as a beginner!
These techniques are your secret weapons. Each day, each practice session, you're getting closer to where you want to be.
You're building confidence, training your fingers, and tuning your ear.
However, if you’d like to be part of a community of bassists just like you, and have a customized plan for your learning, check out the SBL Academy.
You can get started with a no-risk, 14-day free trial!