
How to (Re)String a Bass Guitar: A Step-By-Step Guide
When was the last time you changed the strings on your bass guitar?
If you’ve been putting it off because the thought of doing it feels like you're about to defuse a bomb, you're not the only one!
That mix of “Am I doing this right?” and “What if I break something?” is pretty common for beginners.
But playing with old, worn-out strings is like trying to have a gourmet sandwich with stale bread. Not exactly the vibe you're going for, right?
It's alright to feel a bit lost if it’s your first time—or you just haven’t done it in a while.
Today, I’m going to walk you step-by-step through the process of how I restring my bass after 15 years of doing it.
By the end of this post, you’ll have a shiny new set of strings to practice with, a sense of pride that you were able to do it all on your own, and an eagerness to start laying down a groove!
Step 1: Replace One String at a Time
Restringing your bass guitar doesn't have to be an overwhelming task.
The key is to take it one string at a time and to replace the strings in the correct order.
(And if I’m being honest, I’ve messed it up more than a few times. So if it happens to you, don’t beat yourself up!)
There are three reasons for this:
1. It makes the process more manageable. It’s easy to forget what the initial setup looked like once you remove the strings.
2. Doing one string at a time lets you glance at the other strings for direction. If they don’t look the same—you know something is wrong.
3. It protects the neck of your guitar. When you remove all strings at once, it can warp the neck due to the sudden release of tension.
Start with the thickest (E) string—which goes into the first tuning peg. Then work your way to the thinnest (G) string—which goes into the last tuning peg.
If you don’t want to mess around with the truss rod, I’d recommend doing it this way.
Step 2: Loosen the Tension
It's important NOT to cut the string while it's still tight.
The release of tension can damage the guitar's neck and hardware. Plus you can potentially catch a rogue string to the face.
Instead, turn the tuning peg counter-clockwise to slowly release the tension.
It’s like letting air out of a balloon slowly, rather than popping it.
Step 3: Clip the String
Once the string is loose, clip it near the middle with a wire cutter.
This lets you easily remove it from both the tuning peg and the bridge.
Step 4: Clean the Fretboard
With one string off, it's the perfect opportunity to clean your fretboard.
It's surprising how much dust, sweat, and grime can build up under there. Over time, it can affect the playability and longevity of your bass.
Just use a microfiber cloth to gently wipe down the exposed area.
You'll find the fretboard looks brighter and feels smoother after a good clean.
Step 5: Seat the New String in the Bridge
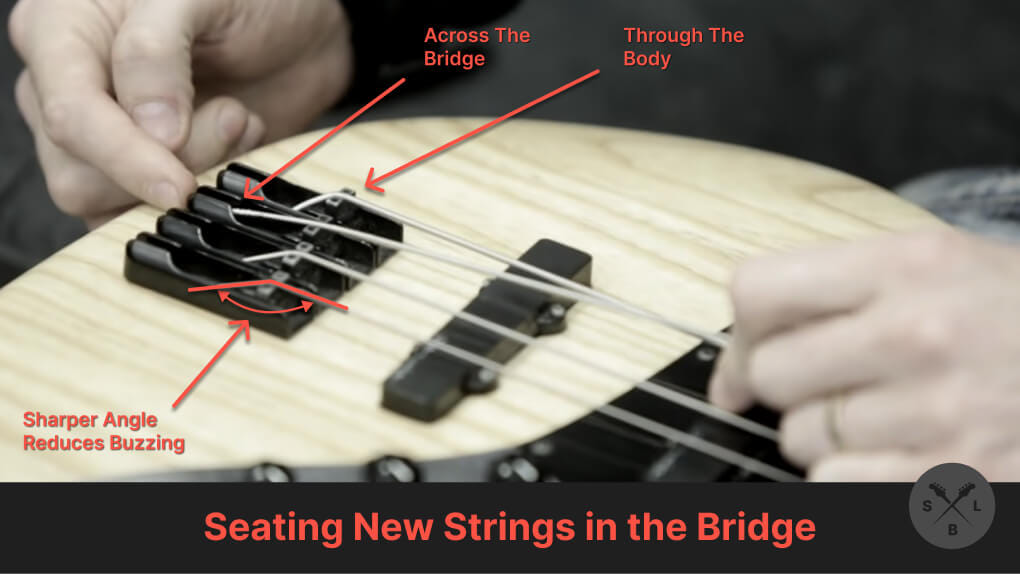
Depending on your bass, you might have two options for doing this (take a look at the above photo for reference):
- Across the bridge (the string I’m pointing to in the photo)
- Through the body (the other strings in the same photo)
If you have the option, I would always go through the body.
Sometimes (depending on the strings), the strings are color-coded at the ball ends, but not always.
It angles the string better over the saddle. This keeps the string stable and ensures it vibrates properly. Meaning you avoid any unwanted buzzing as you play.
If you don’t have that option, don’t worry about it, it’s just a nice-to-have feature.
Step 6: Thread and Cut the New String
Once you thread the string through the tuning peg, it’s important to cut the string to the right length before you start winding it.
Otherwise, you’ll have a bunch of extra windings around the post of the tuning peg, which can lead to your string slipping.
If your strings start slipping, you’re going to have tuning issues and you’ll need to return your guitar often.
How to Cut the String Properly
Line up the string with the right post.
Then, give it two pegs of extra length, which is around 10 cm or 4 inches.
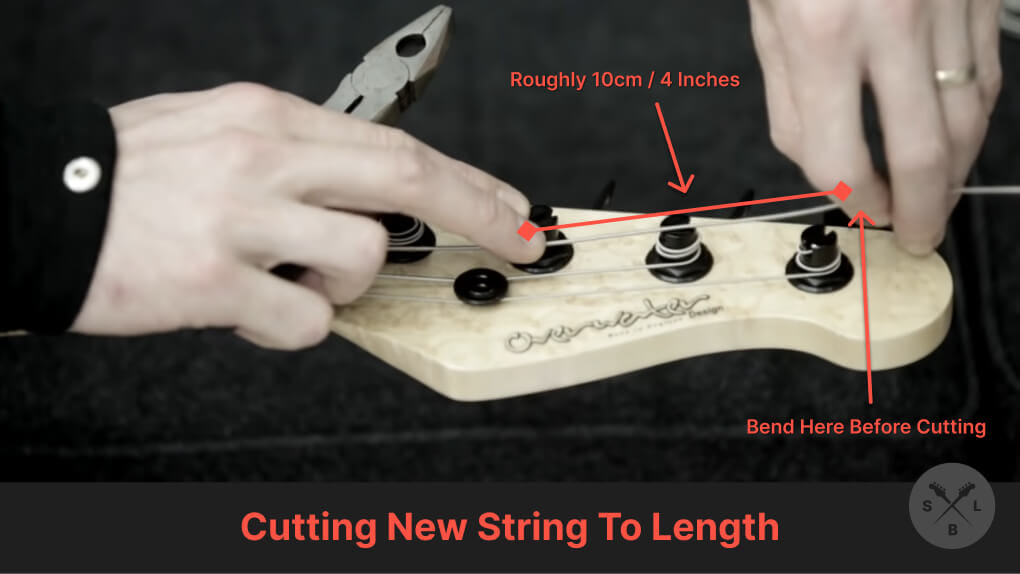
As an example, if you were changing your A string. Pull it to the fourth tuning peg, and then bend the string where you’re going to cut it.
Cut just after the bend so there’s a little notch at the end of the string.
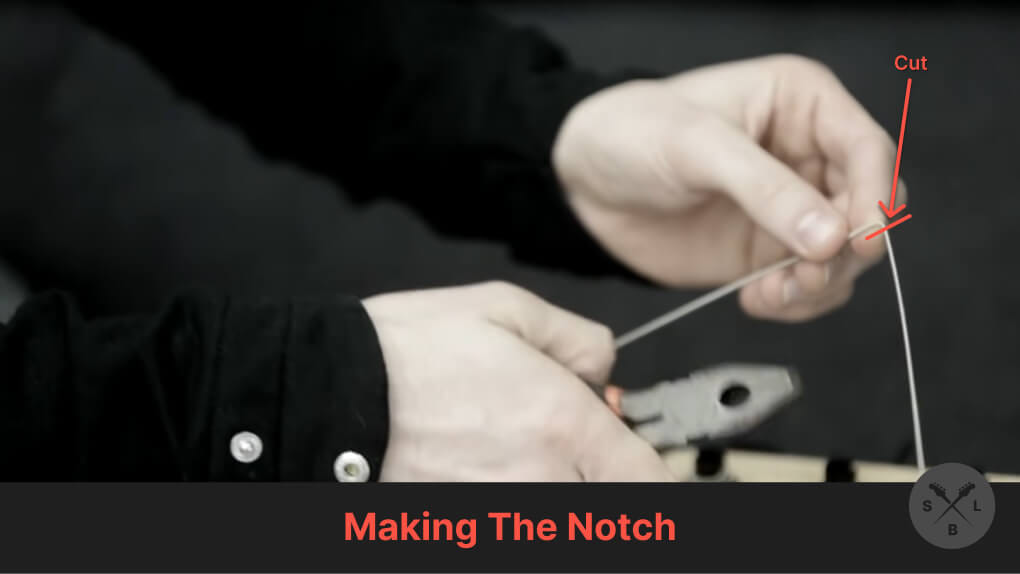
This little notch prevents the string from slipping and saves you from having tuning problems later on.
Step 7: Wind the String
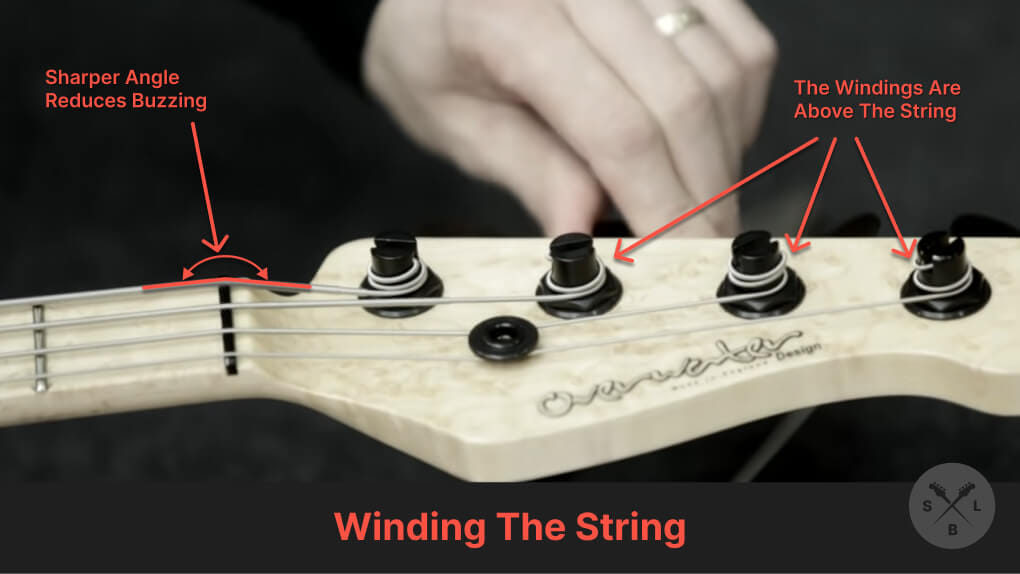
Make sure you wind the string in the right direction. Check the other posts to make sure you’re doing it right.
Wrap the string in a downward spiral, making sure each wind is below the last. Push the string down as you wind the tuning peg.
This makes sure that the string doesn’t go above the windings. It forces the string to come over the nut and down.
Do a double-check to make sure the windings are always above the string.
This secures the string and ensures even tension. The winding should be neat and tight, without overlapping or gaps.
Otherwise, there’ll be buzzing when you play.
Step 8: Tune the String
Start by turning the tuning peg clockwise, slowly increasing the tension until the string reaches the right pitch.
If you want to learn how to tune your bass guitar, check out the article I wrote on the topic.
I recommend using the online bass tuner in our Groove Trainer.
Or, if you want to train your ear,
- Play the 7th fret harmonics of the D String
- And the 5th fret of the A string
They’re the same notes, so you tune the new string until they sound the same.
The key here is patience and precision. Rushing can lead to over-tuning and potentially snapping the string.
Also, don’t worry about getting the tuning perfect yet, because we’re not done.
Step 9: Stretch Every Part of the String
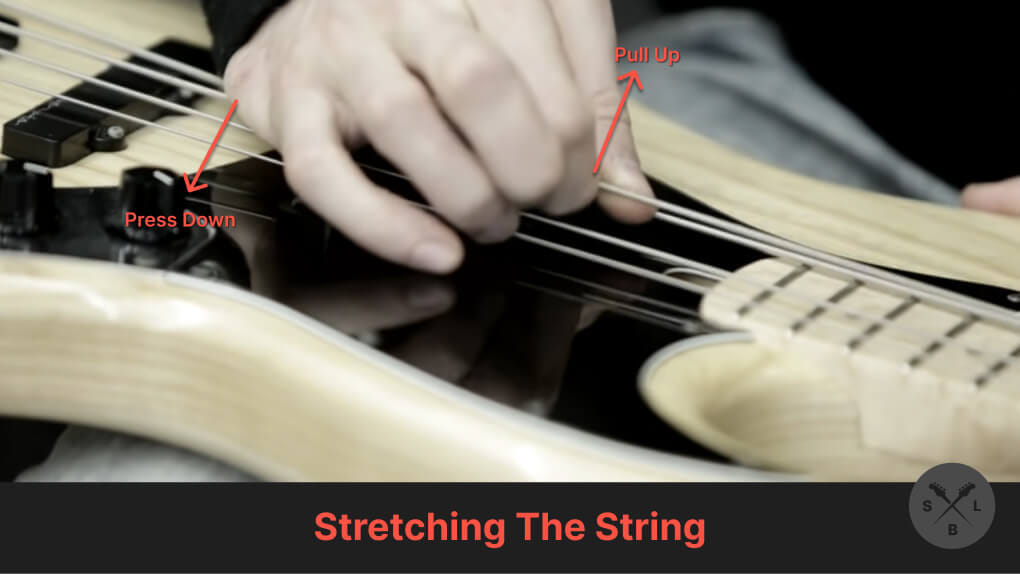
Once you’ve got the string on properly and tuned, it’s time to stretch the string.
This helps the string settle in and maintain its tuning. It's a bit like breaking in a new pair of shoes.
You’re going to gently stretch the string by placing your palm across the strings and getting your index finger under the new string.
Then pull it upwards for a couple of seconds and release it. You’re not using all your strength, but give it a good tug.
Repeat this motion and stretch every part of the string from the bridge to the nut.
After you’ve stretched the string, return it.
Keep stretching and retuning your string until it stays in tune.
Step 10: Seat the String Over the Saddle
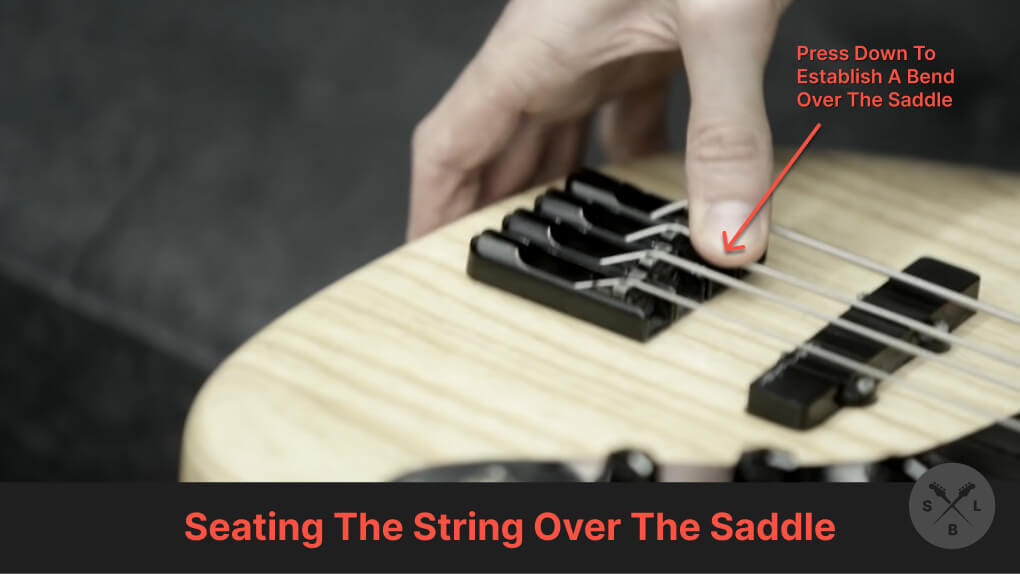
The last step in the process (and the one most bassists forget) is to make sure you’ve got a good angle on the string where it sits in the saddle.
Press down lightly where the string leaves the saddle (where I’m pressing in the photo).
You don’t want the string to be floating. This bends it in place and prevents any intonation issues.
Step 11: Repeat With Each String (If You Need To)
The overwhelming idea of changing your strings can be broken down into the methodical process of changing one string at a time.
And now that you’ve got the know-how, just repeat the process for each string. Every time you do it, you’ll get better and a little bit faster.
Your Path to Next-Level Bass Playing
So you've just restrung your bass, and it feels like you've conquered a mini-mountain, right?
Now, let's shift gears to mastering bass playing.
Learning on your own is cool, you can pluck and strum, and figure out some tunes…
… but you lack any structured guidance.
Without a clear roadmap, it's easy to miss fundamentals or develop an imbalanced skill set. You might find yourself focusing on certain techniques while neglecting others, leading to gaps in your playing.
Now imagine if you had a seasoned bassist showing you the ropes. Being mentored by someone who's already played the gigs you dream of!
It's your express ticket to getting to the next level.
If that’s something you’re interested in, try the SBL Academy free for 14 days!