
NEW Program Alert: The Groove Accelerator is OPEN for enrollment! Limited Time Only —Join Now
Learning to Play the Bass Guitar (Your Very First Steps)
So you’ve decided to learn the bass guitar as a beginner? A fine choice! I might be biased, but I truly believe the bass is the most awesome instrument in the world.
There’s nothing quite like walking your fingers up and down the neck, teasing out a bass line, and feeling that groove travel through your body!
But before you can get to that point, you need to take care of the basics.
In this beginner bass lesson, I’m going to break down the essential knowledge and skills you need to have, including:
- The various parts of the bass guitar
- How to plug in and tune your bass
- Essential technique and theory
- And how to play an actual bass line
Once you’ve worked your way through this article, you should feel a lot more comfortable with your bass guitar, more confident in your music theory, and ready to take the next step!
As always, see you in the shed…
Scott :)
Originally published on October 10th. 2020, this post was updated and republished on August 3rd, 2023.
Table of Contents
- Bass Parts: The Nuts and Bolts of Your Instrument
- Setting up Your Bass Amp
- The Ins and Outs of Tuning Your Bass
- Nailing Your Technique
- Theory for Beginners
- Bass Line Example
- Free Beginner Bass Resources
Bass Parts: The Nuts and Bolts of Your Instrument
As a general rule, it’s a good idea to understand the tool you’re using before you start using it.
You wouldn’t get behind the wheel of a car without knowing the difference between the accelerator and brake, would you?
It’s the same for the bass guitar. By knowing what the function of each and every part of the bass is, you’ll be better able to manipulate the sounds you want – and understand why it’s not working if they don’t manifest.
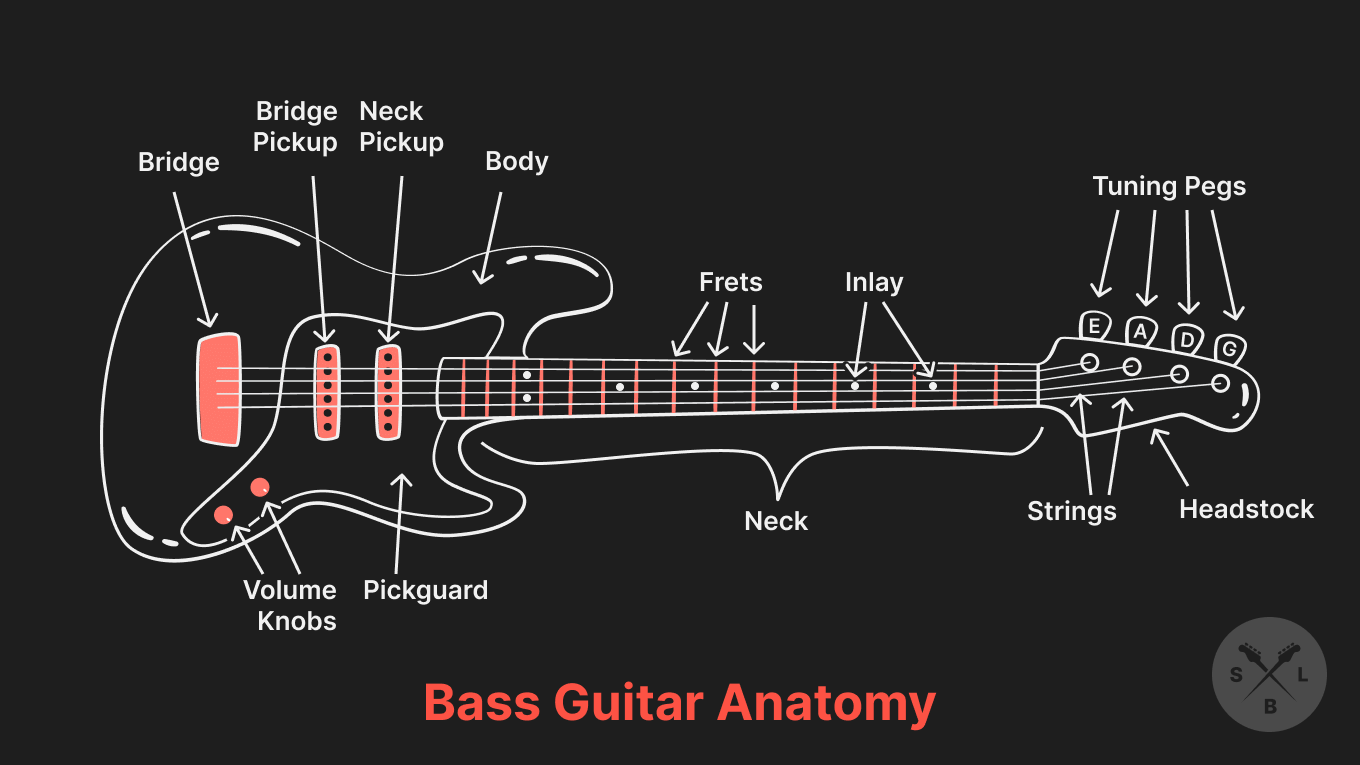
Take a look at this diagram to guide you through the essential elements, then let’s examine each one in more detail below.
1. Strings
The strings are the essential lifelines of the bass guitar – without them, there is no sound.
I’m assuming for the sake of simplicity that your bass guitar has four strings, but it’s not unheard of for bass guitars to have up to 10!
As the fingertips glide and dance along these strings, they produce the rhythmic foundation that propels every song forward, defining the band's groove and locking in with the drummer's beat.
Together, these strings give life to the backbone of the song being played and are an indispensable bass guitar component.
2. Body
Next up, we have the body – the heart and soul of the bass guitar, where beauty meets functionality.
Typically crafted from solid wood, it comes in many diverse shapes such as the iconic Fender Precision or the Ernie Ball Music Man.
The design of the body influences the tone and interacts with the strings to create the signature bass sound that we all know and love.
3. Pickups
The pickups are the ears of the bass guitar. Located beneath the strings, pickups work with magnets to transform vibrations into electrical signals, carrying your bass’ sound through an amp for the world to hear!
There are a few different types of pickups including:
- Split-coil humbuckers
- Single-coils
- Active pickups
Each offers its own distinctive tonal flavors. Like a sonic fingerprint, pickups define a bassist's style and shape the music's personality. Whether slapping funk or grooving rock, pickups make it possible to capture the magic.
4. Bridge
The bridge is the anchor of the bass guitar. Positioned at the instrument's lower end, the bridge ensures precise string placement and height, affecting intonation (pitch accuracy) and action (height above the fretboard).
5. Saddles
The saddles are small metal pieces on the bridge that hold the strings in place. They can be adjusted to set the string height and intonation, ensuring accurate notes along the fretboard.
These little components give bassists control over their instrument's tone and playability, allowing for precise and consistent sound across various playing styles.
6. Controls
On the bottom of the guitar body, you’ll see a set of controls. While these can vary, basses generally have the following controls:
- Volume. Adjusts the volume of the bass guitar
- Blend knob. Mixes the pickups
- EQ slider. Boosts lows, mids, or highs, but is only available on active basses
7. Neck
The neck is the long, slim part of the bass guitar that holds the frets and strings.
Made of strong wood, it connects to the body and supports the fingerboard. You use the neck to slide along and create notes, chords, and riffs – it’s where players find their groove and their unique voice.
8. Frets
The frets are the metal strips running along the fingerboard, divided into ever smaller segments, each of which represents a specific note.
Frets act as guides, helping players find the right positions for accurate playing and creating different pitches.
9. Position Markers
See those white dots along the fingerboard? Those are what we call position markers.
They act as reference points while playing to help you see where you are on the fretboard and smoothly transition between notes.
The single dots occur on the 3rd, 5th, 7th, and 9th fret.
The double dots occur on the 12th fret where the octave is.
Knowing how to deftly use position markers is one of the key tenets of mastering your fretboard.
10. The Nut
The nut is the small plastic or metal strip at the top of the bass guitar’s neck.
This small, unassuming strip is actually quite an important element of your bass.
The nut holds the strings in place and maintains proper spacing above the fingerboard, acting as the starting point for the strings. Without the nut, it would be infinitely harder to tune your bass guitar accurately! As such setting up your nut height properly is paramount for the whole setup of the bass.
11. Tuning Pegs
The knobs on your bass guitar’s headstock are called tuning pegs or machine heads. They anchor the strings to the top of your bass guitar and allow you to adjust string tension to raise or lower the pitch.
12. Headstock
Finally, we have the headstock – the top part of the bass guitar's neck that houses the tuning pegs and anchors the strings.
Setting Up Your Bass Amp
So the next category that I want to look at is – how to plug in your bass.
You understand what all of the parts are, but how do you actually get some sound out of this thing?
Well, you’re going to need three things – the bass, a cable, and an amp.
The amp is responsible for carrying the sound of a bass guitar.
Generally speaking, our amp will have a main volume dial, plus a few options for adjusting the frequencies that make up the sound – a treble, a middle, and a bass. Some amps will have a low mid and some might not.
To get started, set the bass, the middle, and the treble at 12 o’clock. This will create a flat EQ, also known as equalization.
Now you’re ready to plug in and turn up – here’s how:
- Save your ears by making sure the volume knob is turned to zero
- Make sure your EQ knobs are centered
- Plug the cable into your jack socket and make sure it’s in properly
- Plug the other end of the cable into your amp
- Turn up the volume knob
- Play a few funky licks to test if your sound is working
To get into the nitty gritty of amplifier setups, read my article on bass amp settings.
The Ins and Outs of Tuning Your Bass
Something that beginners overlook is tuning – but it’s something that you should be doing every single day.
The good news is that tuning is quick and easy.
Now, while I recommend getting a tuner – whether that’s a plug-in tuner, a clip-on tuner, or the built-in tuner of my Groove Trainer app – I also think it’s important to learn how to tune your bass guitar by ear.
And to do that, you need to know your strings.
I like to remember them with the acronym: Every Angry Dog Growls. So from top to bottom, the strings are E - A - D - G.
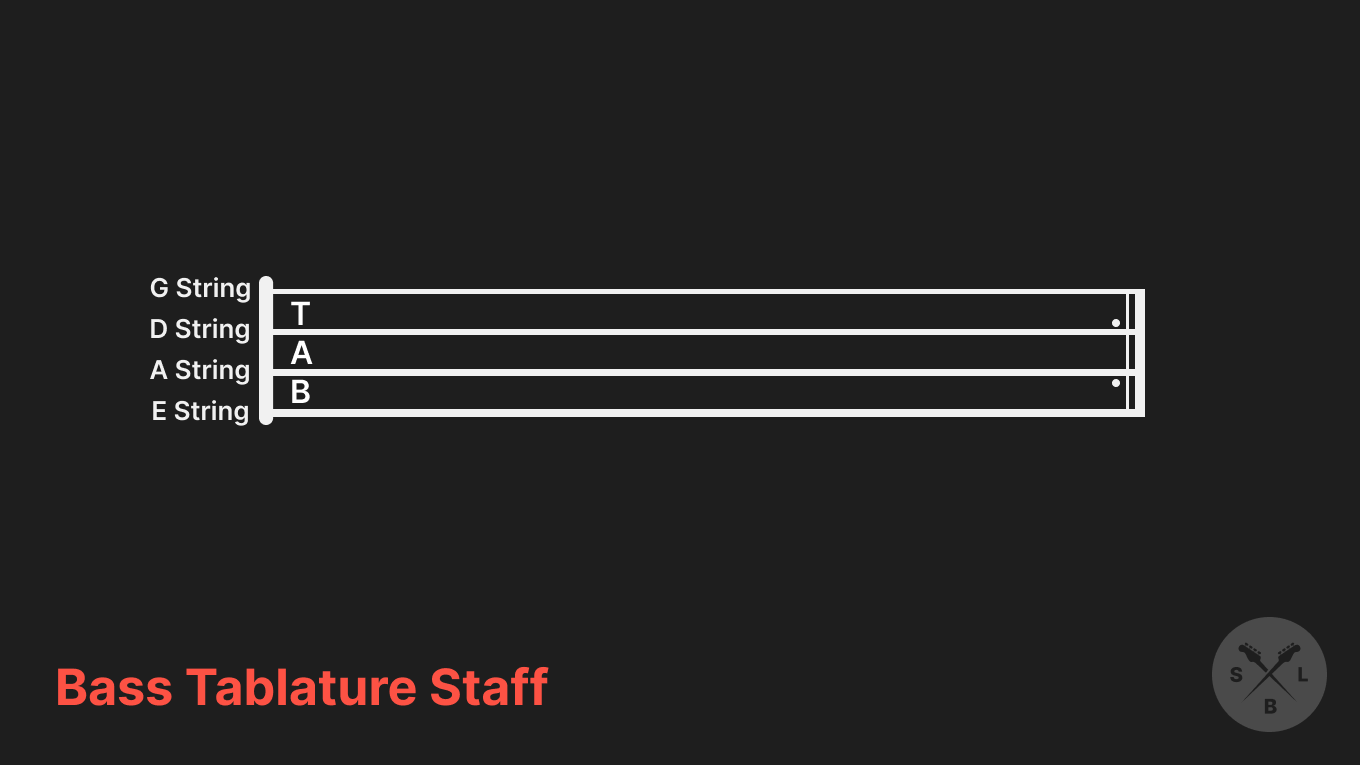
Alright, now how do you actually tune the strings, especially when you’re a beginner and can’t possibly know what a G or D note sounds like?
Simple:
- Hold the 5th fret of the E string and play it
- Play an open A string
- These two notes should sound the same. If they don’t, then you have to tune your E string until the 5th fret produces the same note as your open A string
- Continue this process for every string:
- Hold the 5th fret of the A string and play the open D stringHold the 5th fret of the D string and play the open G string
Boom – you just tuned your bass by ear!
Nailing Your Technique
Technique – how you’re fretting notes, what you’re doing with your picking hand, and how you hold the bass – is incredibly important to your bass playing. It’s kind of like the foundation that allows you to transform your musical ideas into reality!
Now “technique” is also a broad umbrella term encompassing many different aspects. From your posture to the way you hold your bass, to your speed, dexterity, and rhythm, there are many things to consider when improving and refining your technique.
As a beginner, there are a couple of things you should be taking note of from the start:
Firstly, body posture and guitar positioning.
Make sure you’re sitting on a stool or a seat that gives you a 90-degree bend on your leg. You want to maintain a nice straight back when sitting.
Place the bass on your right leg (if you’re right-handed).
If you find that your left arm is suddenly very cramped and awkward, simply push out the headstock until your bass is at an almost 45-degree angle to your body.
This is the ideal posture for playing bass and gives your fretting hand a lot of space to move comfortably up and down the neck.
Easy, right? You’re now in the right position to start playing!
Plucking
Plucking, also known as fingerstyle, is a technique where you use your fingers (usually the index and middle fingers or sometimes the thumb) to pluck or strike the strings.
To get started with plucking, try this exercise:
- Place your thumb on top of the string, rest your arm gently on top of the guitar, and leave a space between your wrist and the guitar
- Use your index finger or middle finger and pluck upwards towards you all the while using your string above as a stopping point for your plucking finger
- Play eight notes on each string
- For the sake of this exercise, just alternate plucking between your index and middle finger
Fretting
As mentioned previously, for fretting, make sure that your fretting finger is right behind the fret.
For your hand position, imagine you have an orange in your hand and your fingers are curled around it.
Place your thumb gently on the back of the neck and curl your fingers around the strings.
Make sure you have a little gap in between your fingers and your thumb, then drop your wrist slightly.
Theory for Beginners
Theory might seem a little intimidating, but there are a few things that you should know as a beginner that are really easy to grasp.
Now we have already covered the names of the strings – E, A, D, and G.
But let’s say you’re jamming with a guitarist and they play a C chord.
As a bassist, what do you do?
You actually play a C as well. You play what’s known as a root note. In this case, the root note of the C chord would be C.
This is a great way to play along when you’re beginning – just hold down that root note.
The other beginner theory that’s very worthwhile knowing is about half-steps and whole steps.
A whole step, also known as a whole tone, is moving up two frets on the neck of your guitar, whereas a half step, also known as a half note, is moving one fret on the neck of your guitar.
For all of the beginners I teach, I recommend that you learn the first five frets of the bass.
You’ll find a chart for these first five frets in the workbook for this lesson. Grab the FREE workbook here!
Play Your First Bass Line
And now for the final piece – let’s get to playing an actual bass line.
The below image shows both musical notation and bass tabs. If you’re unsure how to read the latter, then check out this article we wrote about how to read bass tabs.
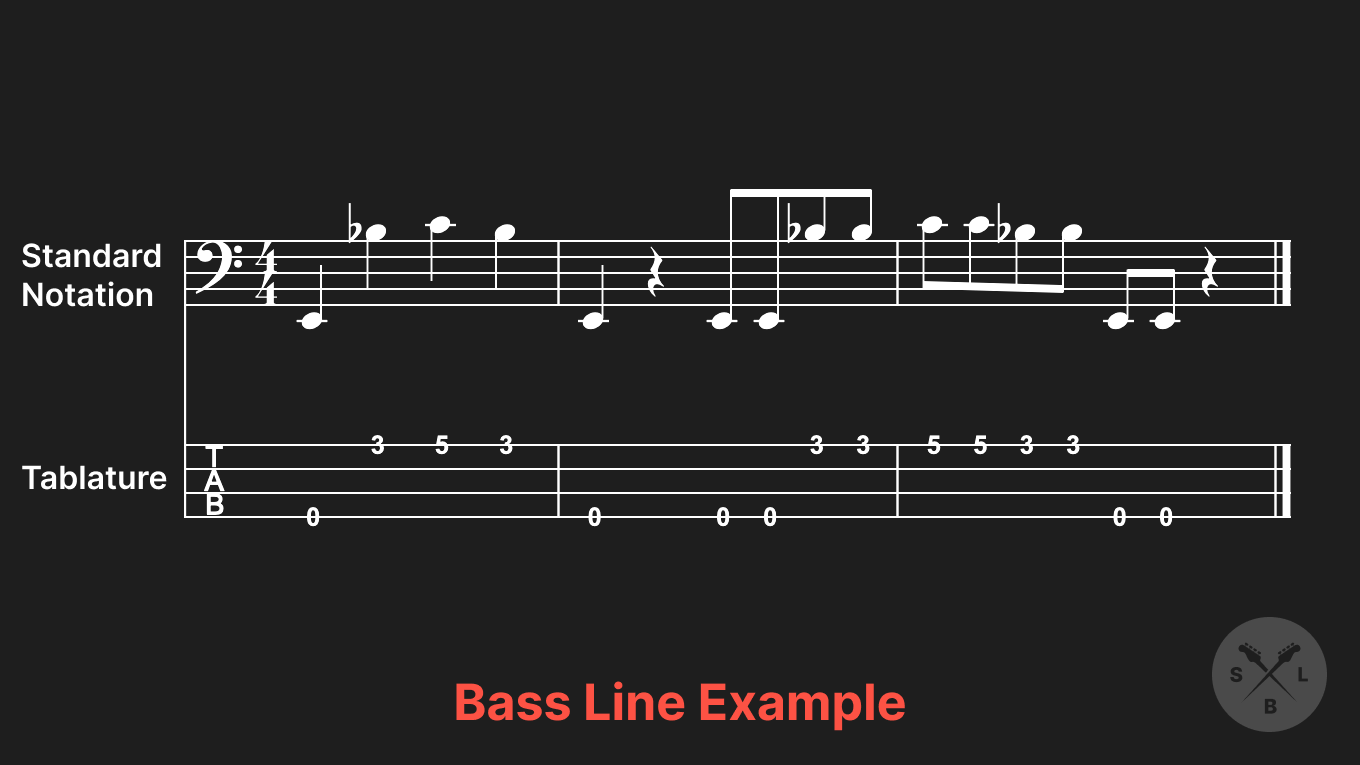
This bass line only consists of three notes. Here’s how to play it:
- Pluck an open E string
- Pluck the G string on the 3rd fret
- Place your little finger, your ring finger, and your middle finger on the 5th fret of the G string
- Move back to the 3rd fret of G
- And finally back to the open E
Once you have this down, try the full pattern starting with 1 pluck, then two plucks for every note, then four plucks for every note. And then go back to two plucks.
Free Beginner Bass Resources
We’ve covered a lot today, so make sure to take your time with it. But don’t hesitate to move on to the next challenge when you’re comfortable – I won’t hold it against you if you can’t hold back!
Wherever you are on your bass-playing journey, the SBL Academy will help you level up with the world’s finest bass instruction.
Try the SBL Academy free for 14 days!