
NEW Program Alert: The Groove Accelerator is OPEN for enrollment! Limited Time Only —Join Now
How to Tune Your Bass Guitar: A Practical Guide + Online Tuner
One of the most important things to learn when you start playing bass is how to tune it.
Right now, you might feel a little overwhelmed or even a little intimidated. But the good news is that tuning gets easier and faster the more you do it!
Remember that even the greatest bass players were beginners once. We all start from the same place – a feeling of excitement and uncertainty. It's part of the journey and what makes bass guitar for beginners daunting, yet exhilarating.
In today’s guide, I’ll show you:
- The different ways to tune a 4-string bass guitar
- Four tips that will keep your bass in tune longer
- What “Drop D” tuning is and how to do it
- How to tune a 5-string and 6-string bass
Let’s dive in!
Originally published on the 17th of August, 2023, this article was republished on the 7th of May, 2024.
How Often Should You Tune Your Bass Guitar?
If you’re wondering how often you should tune your bass, the answer is every time you use it. Bass guitars go out of tune all the time, so whenever you pick it up to play, check to make sure it’s in tune. Most of the time, only one or two strings will need a minor adjustment, but the goal is to make it a habit.
And before long, you’ll do it automatically—immediately noticing when one of your strings is out of tune!
3 Ways to Tune a Bass Guitar
There are three main ways you can tune your 4-string to make sure you get the perfect pitch every time you play.
1. By Ear
As a musician, it’s important that you develop your ear.
Being able to tune your bass by ear is a valuable skill to have. It not only gives you a sense of freedom and confidence about your bass playing, but it comes in handy when you don’t have access to a tuner.
For example:
- If you lend it to one of your bandmates
- If the battery in your tuner dies
- If you forget where you put it
Don’t worry if you’ve never done it before – it’s actually pretty easy!
I’ll share an online tool in the next section that you can use to tune your bass and train your ear at the same time.
2. Using an Electronic Tuner
A good craftsman has the right tools for the job, and as a bassist, having an electronic tuner is essential.
It works by detecting the pitch of a musical note produced by the instrument and indicating whether the note is in tune, sharp (higher than the desired pitch), or flat (lower than the desired pitch).
There are a few different types of electronic tuners, including:
1. Clip-on tuners. These attach directly to the instrument, such as a bass guitar's headstock, and detect pitch through vibrations.
2. Pedal tuners. These are integrated into a pedalboard and are operated by foot.
3. Chromatic tuners. These can tune any note, providing flexibility for tuning any instrument.
I personally think that a clip-on tuner is your best friend. They’re usually decently priced and do a great job of helping you tune your bass.
That being said, there are tons of options available, and most are fairly intuitive and easy to use.
3. Using an Online Tool
You can also tune your bass using online tools, and luckily for you, I built one specifically for this purpose!
It’s called the Groove Trainer and it has a built-in online bass tuner.
It's a bassist's best friend and comes with most features you might need to practice and level up your bass playing. For this article, we’ll be focusing on the tuner feature.
here’s how to use it:
- Open up the Groove Trainer on your computer (if you have a mic) or mobile device (you can use your phone’s internal mic.)
- Put the mic near your bass, then pluck each of your strings – E, A, D, and G.
- The Groove Trainer will tell you whether the string is in tune. If it’s not, it will tell you whether you need to tune the string up or down.
- Pluck each string again to check that they’re in tune, and you’re good to go!
How to Tune a 4-String Bass (By Ear)
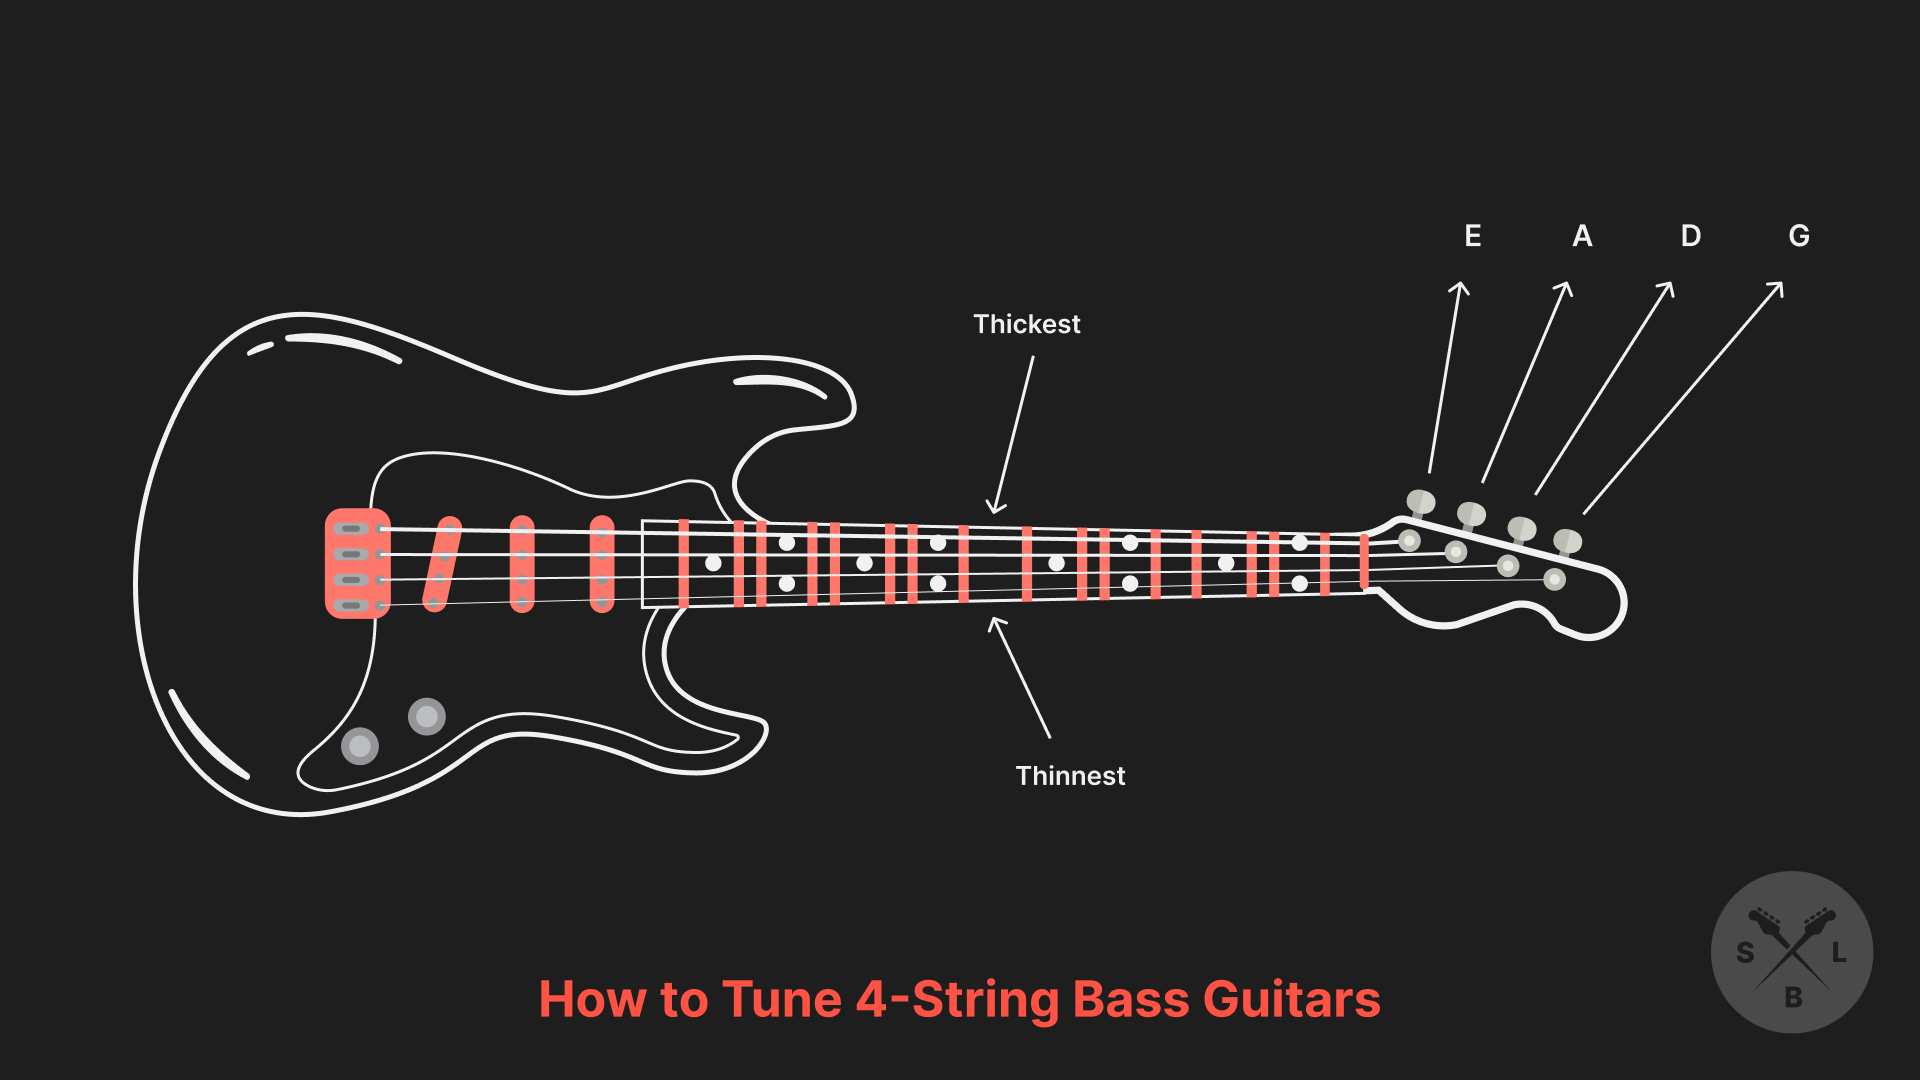
Let’s take a look at how to tune your bass by ear. You’ll start by getting a properly tuned note that you can reference for the rest of your strings. Then you’ll tune each string in turn from the thickest to thinnest – E, A, D, and then G.
I like to remember the order of the strings with the acronym: Every Angry Dog Growls. So, again, from thickest to thinnest, the strings are E - A - D - G.
But how do you tune the strings, especially if you’re a beginner and don’t know what a G or D sounds like?
Step 1: Get a Reference Note
All you need is a note that’s already properly tuned (a reference note). Specifically, you need an A note.
There are a couple of ways to do this. You can:
- Ask one of your bandmates to play you a low A
- Play a low A key on a piano or keyboard
- Use the Groove Trainer
Here's a link to the Groove Trainer.
Once you’ve got that, you’re ready to tune your bass guitar.
Step 2: Tune Your A String
You’re going to match your A string with the reference note.
To do this, you have to:
- Listen to the reference note
- Play your A string
- Compare the pitches
Then, using the second tuning peg on the headstock, adjust your A string to match the reference pitch.
Once they sound the same, your A string is in tune.
Step 3: Tune Your E String
Because the A string is now in tune, the rest is simple.
You’re going to tune the bass to itself. To do this:
- Hold the 5th fret of the E string and play it
- Then play an open A string
These two notes should sound the same. If they don’t, then tune your E string with the first tuning peg.
Repeat the process above until your fretted E string makes the same note as your open A string.
When they do, your E string is in tune.
Step 3: Tune Your D String
The process is the same for the last two strings:
- Hold the 5th fret of the A string and play it
- Then play the open D string
Tune the D string with the third tuning peg until it plays the same note as the fretted A string.
When they do, your D string is in tune.
Step 4: Tune Your G String
Repeat the process for the last string:
- Hold the 5th fret of the D string and play it
- Then play the open G string
Adjust it with the fourth tuning peg until your G string plays the same note as the fretted D string.
And voila, you just tuned your bass by ear!
Don’t Beat Yourself Up
Tuning your bass by ear gets easier and faster the more you do it. So if you didn’t get it perfect, or it took a while, that’s normal.
Honor yourself for taking the time to learn how to do it, and then trust the process. You’ll get the hang of it!
If you want to make sure you did it right, read the next section.
How to Tune a 4-String Bass (Using an Electronic Tuner)
It’s easier to tune your bass with an electronic tuner because it tells you precisely when the string is in tune (instead of relying on your ears). It’s also really easy to do!
Here’s how to do it, starting with the thickest strings to the thinnest (E, A, D, G):
Step 1: Set up Your Tuner
With your bass guitar comfortably on your lap, open the Groove Trainer or turn on your clip-on tuner.
Step 2: Tune the E String
- Play the E string (the thickest one), and then check your tuner’s response.
- Use the first tuning peg to adjust its pitch.
- Keep adjusting until the string makes the correct pitch (E).
Tip: You don’t have to get it right on the first try. Play the string several times, and keep adjusting the tuning peg until the tuner says it’s in tune.
Step 4: Tune the A String
Repeat the process with the A string:
- Play the A string
- Check the tuner
- Adjust the second tuning peg until the string is in tune
Step 5: Tune the D String
Repeat the process with the D string:
- Play the D string
- Check the tuner
- Use the third tuning peg to adjust this string
When it makes the correct pitch (D), move on to the last string.
Step 6: Tune the G String
Last up is the G string:
- Play the G string
- Check the tuner
- Use the last tuning peg to make sure it’s in G
Step 7: Check and Fine-Tune
The last step is to play each string consecutively and confirm they’re in tune. Remember, from thickest to thinnest, it's E - A - D - G.
If any of the strings are a bit off, give them a final adjustment.
And that’s it, your bass guitar is now in tune!
The more you go through this process, the more you’ll know what your strings should sound like, and when they’re a bit off. So make it a habit – future you will thank you!
Drop D Tuning and How to Do It
Now that we know how to tune a bass to standard tuning, let’s look at some alternative tunings – namely, Drop D.
What’s Drop D tuning, you ask?
Well, instead of the usual E string, lower the pitch down to a D, and you've got Drop D!
Why do bassists do it?
Because it opens up the tonal range of your bass and gives it a “heavy” sound. Meaning you can expand your sound without adding an extra string.
With Drop D, you can dive into rock, metal, and even some grunge vibes. So if you want to shake things up a bit, give it a try.
Tuning a 5-String Bass
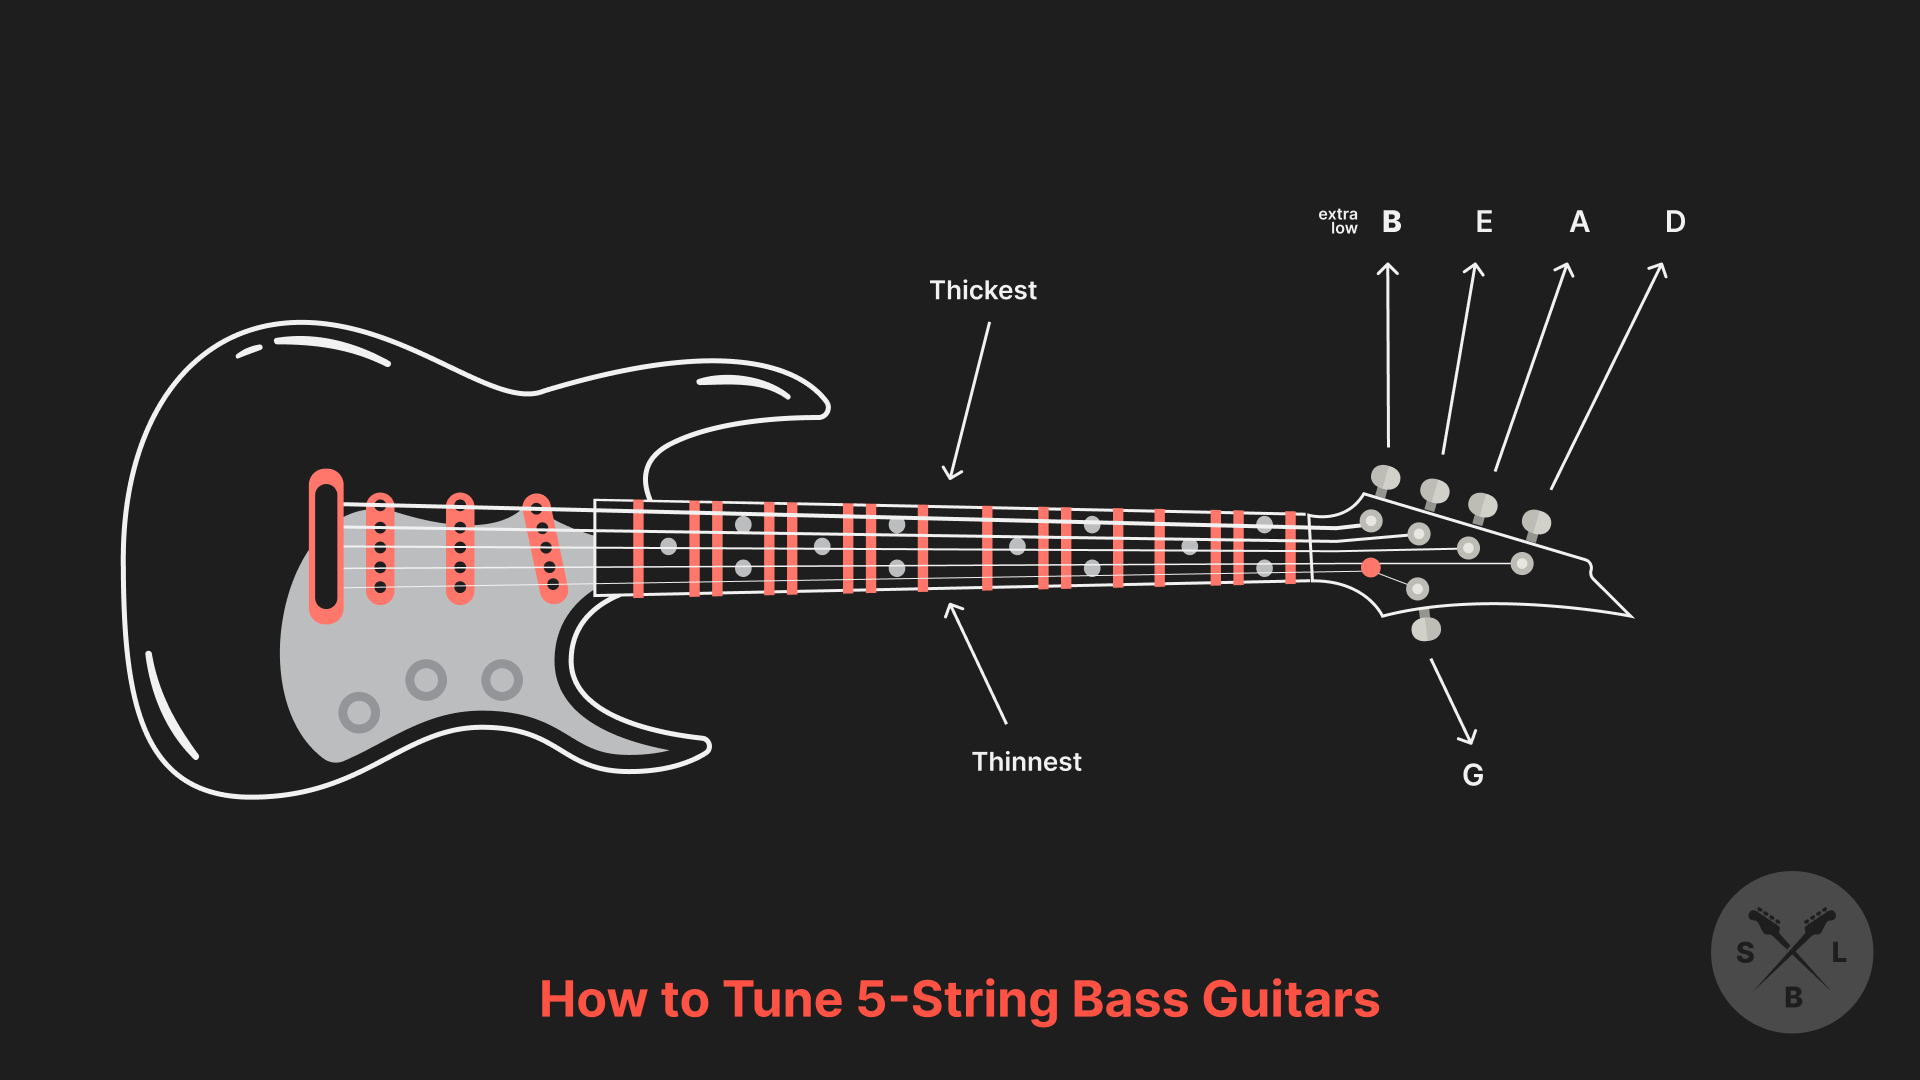
Tuning a 5-string bass is the same as a regular 4-string bass – you've got the standard E, A, D, and G strings. But you also have an extra low B string.
So, you’re tuning would be:
B, E, A, D, G
The B string gives you that extra low-end sound and unlocks new creative possibilities.
Tuning a 6-String Bass
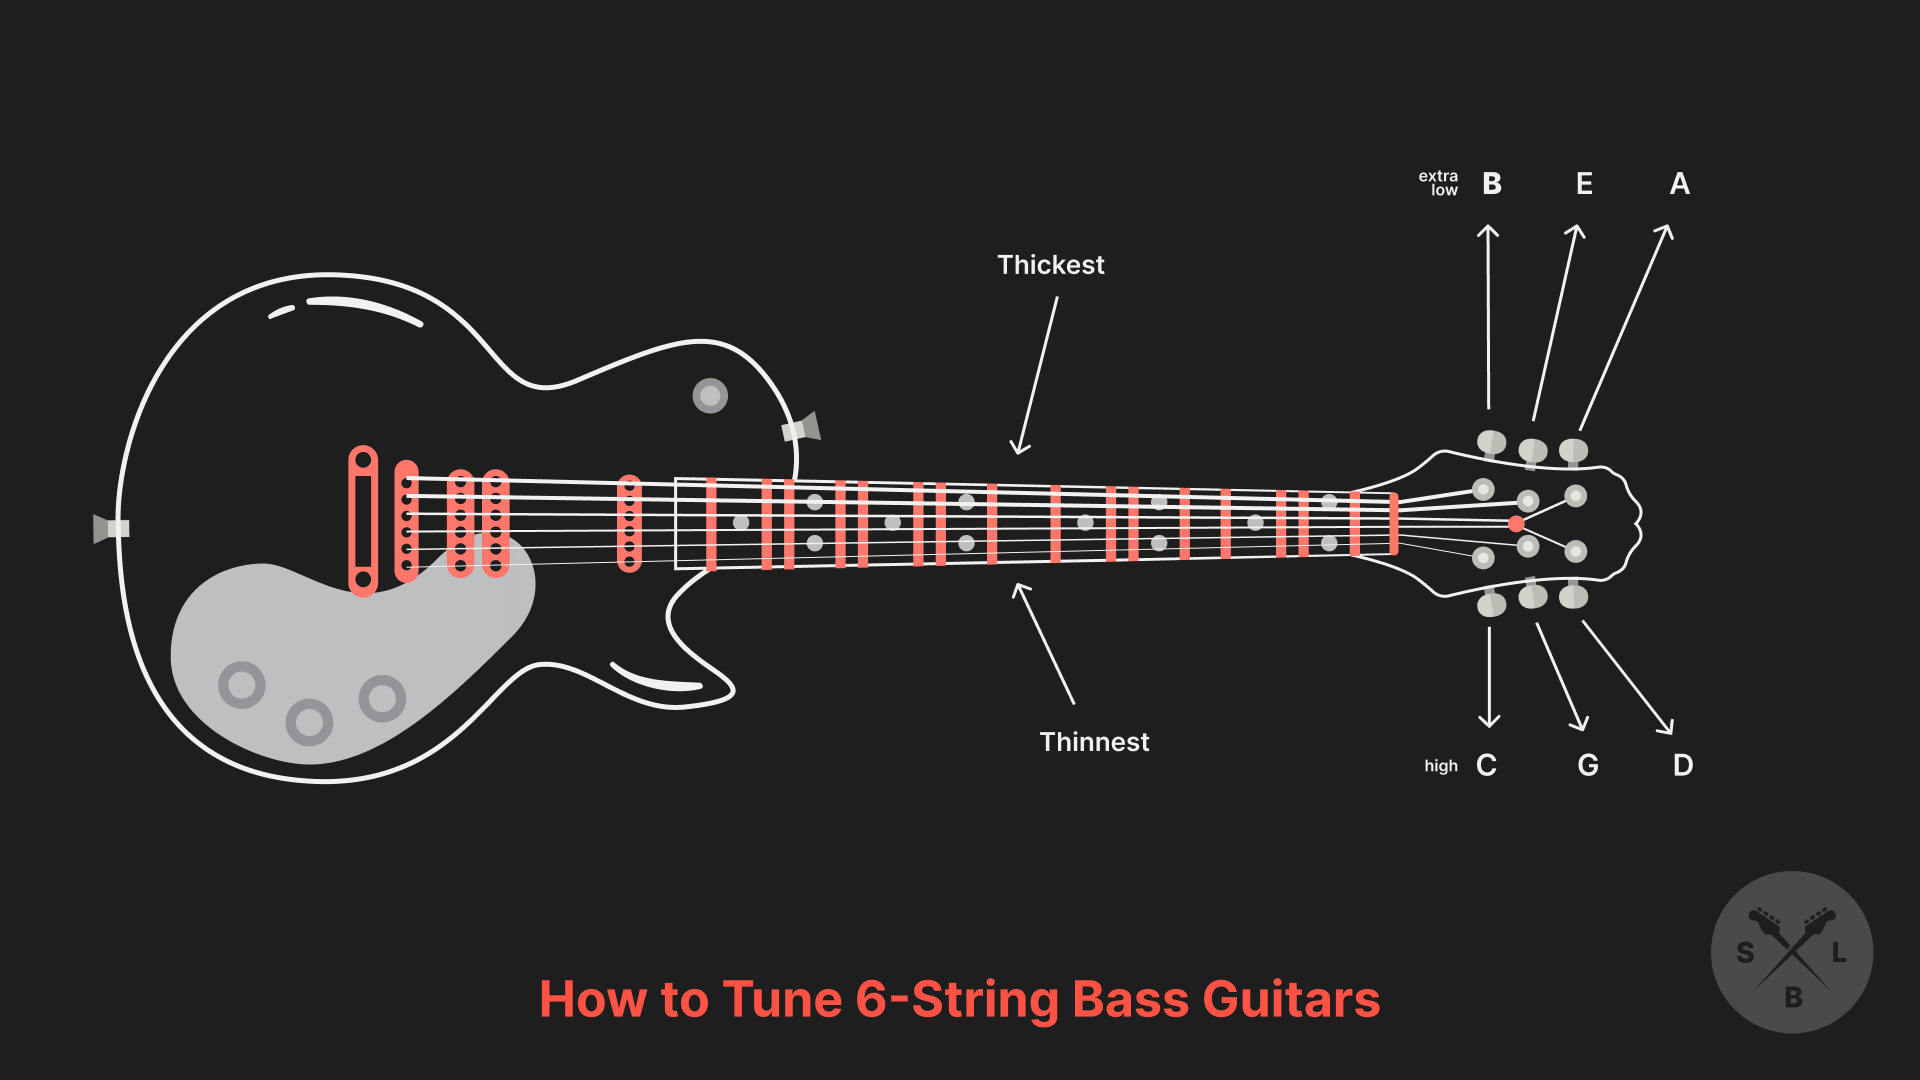
Picture the standard E, A, D, and G strings. Add on a low B string, just like the 5-string bass.
Then, add a high C string, and you’ve got a 6-string bass.
So your tuning would be:
B, E, A, D, G, C
The extra strings create a more dynamic range for you to play.
But don’t worry, you can still get a ton of versatility out of your 4-string. And if you’re just starting to learn how to play bass guitar, a 4-string might be better.
The simplicity allows you to focus on the basics, like finger placement and groove, without getting overwhelmed by the extra strings.
Once you’ve got some experience under your belt and you’re ready to expand your horizons, why not move on to a 6-string!
How to Keep Your Bass in Tune for Longer
The feeling when your bass guitar is perfectly in tune and every note sings like it should, is undoubtedly pretty sweet. And to be honest there’s nothing worse than constantly having to retune your bass, especially when you’re trying to practice with other people!
So to keep your bass in tune for longer, try these tips:
1. Use Quality Strings
String quality matters.
Invest in some high-quality bass strings from reputable brands. Premium strings tend to hold their tuning better, withstand wear and tear, and produce a consistent tone over time.
Should you pick tapewound bass strings or flatwound? Read the article.
2. Stretch Your Strings Properly
If you just installed new strings, take a few minutes to gently stretch them.
Tune each string to the right pitch and then gently pull them away from the fretboard. Then return them. Repeat this process until the strings settle and hold their pitch more reliably.
3. Keep Your Bass Clean
Dirt and sweat can accumulate on the strings, affecting their ability to hold a tune.
So after you’re done playing, wipe down your strings with a clean cloth to extend their life and keep them sounding their best.
4. Change Your Strings
It’s so common for people who don’t like the sound of their bass tone to discover that they haven’t changed their strings in a while.
Everyone’s preference is different, but as a general rule of thumb, you should change your strings every three to six months.
Here's a handy guide on how to restring a bass if you need to.
Level up Your Bass Playing
Congratulations, you've made it!
From plucking that Low E string to unleashing the magic of Drop D, you're ready to start jamming and creating some grooves.
But here's the thing – this journey is far from over.
And if you want to take your bass playing skills to the next level, you’ll need some guidance from experts who’ve already done it.
So I pulled together a bunch of resources and put them all together in one place that will fast-track your progress.
You won’t find this anywhere else, so download your free bass toolkit today!